Connecting using VNC from a Windows computer to a Linux system
Virtual Network Computing, or VNC, allows you to remotely control a Linux computer with another computer through a graphical interface. You will be able to observe a Linux desktop environment and interact with it using the mouse and keyboard from a different computer. This guide will walk you through how to start a VNC session and connect with it when using a Windows-based computer.
Preliminary Notes
Software
For users looking to use VNC on their Windows computer, we recommend using MobaXterm. We find is easiest to get up and running with VNC for new users. This guide is intended for use with MobaXterm and may not be applicable with other terminal and VNC viewing software.
MobaXterm is installed on MCECS Windows computers in labs. Students who are interested in using it on their personal machines can find it on the vendor website:
https://mobaxterm.mobatek.net/download.html
VPN Requirements
Certain MCECS Linux systems, such as the Redhat/CentOS servers (e.g. auto.ece.pdx.edu and mo.ece.pdx.edu), require the use of a VPN when accessing from outside of the PSU campus.
For more information on how to set up OpenVPN on Windows, read our guide in the following link:
https://cat.pdx.edu/platforms/windows/remote-access/openvpn/
Important Terminology
Here are some key terms to remember when connecting with VNC
- VNC session password – this password is used only with VNC. This is not tied to your MCECS login. Because the encryption on this password is extremely weak, do not use a password that you want to keep private as your session password.
- Display Number – when you start a VNC session, it will be assigned a number between 1 and 99 that will identify it on the Linux system you are remotely connected to.
- Port Number – This is equal to your Display Number plus 5900. This number is used by the VNC viewer software to remotely connect with the VNC session running on MCECS Linux systems.
- Host Address – this is the full domain name of the system you want to remotely connect with. This is usually in the form of somecomputer.cs.pdx.edu, somecomputer.ece.pdx.edu, or somecomputer.cecs.pdx.edu
Starting the VNC session
Step 1 – Opening a terminal
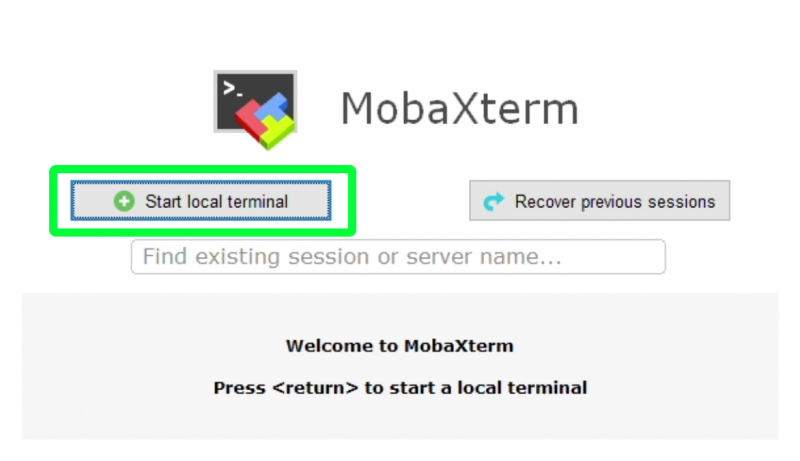
Open MobaXterm and click on the Start local terminal button, as highlighted in the image below.
Step 2 – Connecting to Linux system with SSH
In the command line, enter the following command
ssh your_username@host_name
Replace your_username with your MCECS username and replace host_name with the address of the MCECS Linux machine or server you want to connect with (for example, mo.ece.pdx.edu or rita.cecs.pdx.edu).
Enter your MCECS account password when prompted, and log in to the host system.

Step 3 – Starting VNC session process
Start a VNC session by entering the command vncserver
NOTE: If you see the following message after entering vncserver, this means you have a VNC session already running on this system. Go to the end of this article for more information on how to check for existing VNC sessions and also how to terminate them.

Step 4 – Creating VNC session password
You should now see a prompt to enter a password like in the image below. This will be your VNC session password.
Be aware of the following:
- The session password needs to be at least 6 characters long.
- This password is only used to log in to your VNC session and is not tied to your MCECS account password.
- This password is stored with very poor encryption, so it is advised that you do not use a sensitive password for your VNC session password.
You will also be prompted to enter a view-only password, which can be used by other people to observe your VNC session. If you are unsure about this feature, enter n for “no” and avoid creating one.

NOTE: It is possible you may not see a password prompt. If you have previously used VNC, the new process will sometimes use your previous session password. If you have forgotten your previous session password, run the command vncpasswd to change it.
Step 5 – Getting Display/Port numbers
Your VNC session has been created, and you should see a message similar to the sample output below

The number that appears after the host address is the display number (it is underlined in red in the image above). By adding this number to 5900, this will give you the port number used to connect your VNC viewer to the VNC session.
For example, if your display number is 4, your port number is 5904. If your display number is 12, your port number is 5912.
NOTE: Your display number may not be the same as the sample image above. Make sure to read the output message in your terminal and look for the number after the semicolon for your true display number.
The VNC session is now running on the remote Linux host system and is ready to connect with your VNC viewing software. You can exit and close this terminal if you want, as the VNC session will continue to run in the background. Be aware that the CAT will kill any VNC session that has been idle for more than 48 hours.
Connecting with your VNC session with MobaXterm’s VNC viewer
Step 1 – Opening new VNC viewer session
In MobaXterm, click on the Session button in the upper left hand corner
Step 2 – VNC viewer setup
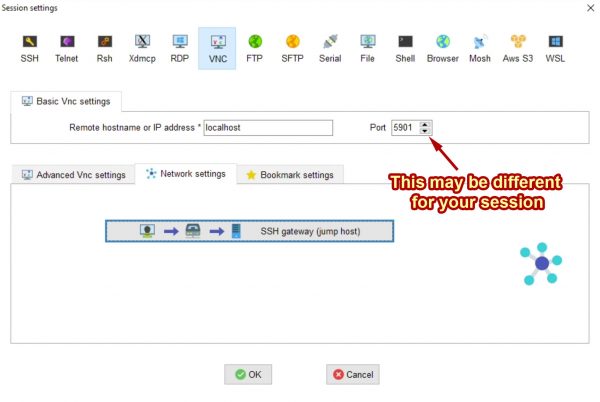
In the window that pops up, look for the VNC icon in the top row and click on it
- In the Remote hostname or IP address box, enter localhost
- In the Port box, enter your Port Number. Recall that this is 5900 plus the Display Number that appeared after running the vncserver command
Step 3 – SSH Gateway setup
In the lower area, click on the Network Settings tab, and then click on the SSH gateway (jumphost) button. The button is highlighted in the blue box in the image above.
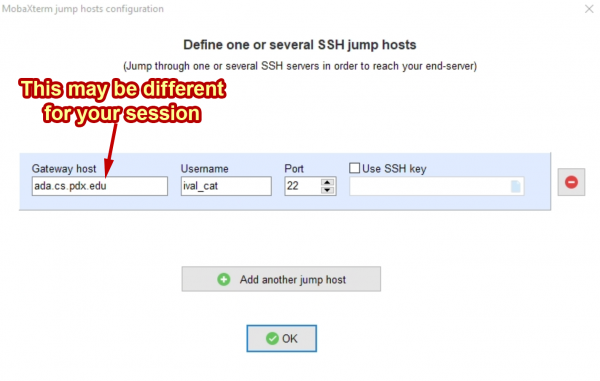
In the window that pops up, enter the following
- In the Gateway host box, enter the address of the host machine that your VNC session is running on (e.g. ada.cs.pdx.edu, mo.ece.pdx.edu, etc).
- In the Username box, enter your MCECS username.
- In Port, leave it set at 22
- Do not check off the box for Use SSH key.
Afterwards, click the OK button with the green checkmark to save these settings and close this configuration window.
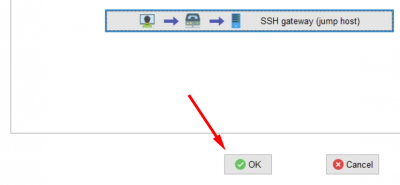
When you return to the previous menu, click the OK button again and connect MobaXterm’s VNC Viewer with the remote VNC session
Step 4 – VNC password guide
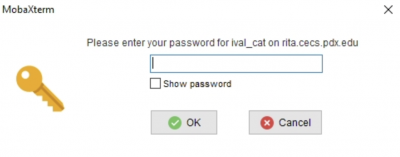
When you see the following window asking for the password for MCECS username on the host address, enter your MCECS login password. This window may or may not appear, depending on how recently you used MobaXterm to view a VNC session previously.
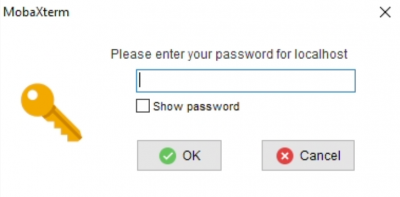
When you see the following window asking for the password for localhost, enter your VNC session password.
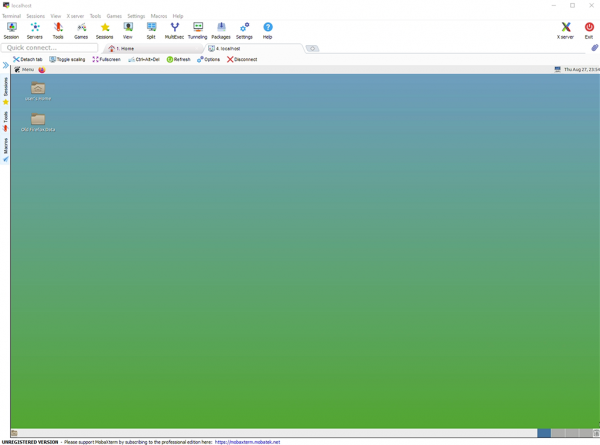
A new tab should now appear in MobaXterm with a Linux graphical interface. Congratulations! You are now remotely connected with a Linux system via VNC.
Disconnecting vs. Terminating your VNC session
It is possible to disconnect from your VNC session and reconnect with it later on to pick up where you left off. In MobaXterm, if you close the tab or click on the Disconnect button, your VNC session will not end and will continue to run on the host system. To reconnect with your session, simply follow the instructions above for Connecting with your VNC session with MobaXterm’s VNC viewer using the same session password and port number as before.
Be aware that on CAT-supported systems, VNC sessions are terminated if they have been idle for more than 48 hours.
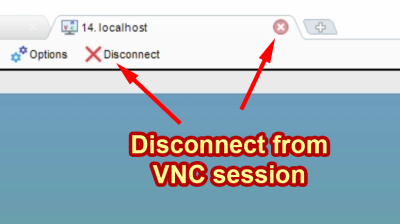
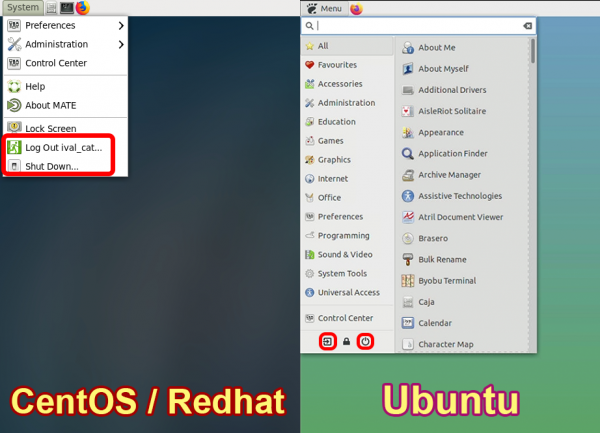
If you want to kill the VNC session, you can use the Log Off option in the Linux graphical interface. The location of these options will vary depending on the version of Linux on the host system and your personal settings.
Alternatively, you can kill VNC sessions using the command vncserver -kill :X, where X is replaced with your session’s Display Number.
![]()
Checking for existing VNC sessions
If you want to check for existing VNC sessions or find its display number, run the command vncserver -list
If there is an existing session, you will see the following output

If there are no sessions running, you will see the following output

Changing your VNC password
If you want to change your VNC session password, run the command vncpasswd and follow the prompts. The session password can be changed even if you have VNC currently running, allowing you to use the new password even after starting a session.

