MobilityPrint doesn’t currently work on Linux machines. Instead of MobilityPrint, we have method utlizing CUPS for printing from your personal computer by sending the job to one of our printers. It does this by configuring CUPS to automatically SSH into one of our servers and run print commands from there. Please note that this is a relatively involved process and comfort with basic Linux commands is recommended. Thanks to Christopher Povirk for the original script.
Note: All the instructions below are to be run on your personal (Tier 3) computer, unless stated otherwise.
| Table of Contents |
|---|
Setting up CUPS
These instructions were tested using Ubuntu 24.04. If you are using a different distro, the exact commands and paths may be different than described. See the bottom of this section for notes about some of the things you might run into.
1 – Login as root
Most of the commands will need to be run as root. It is easier to be logged in as root than to use sudo with every command. Unless otherwise stated, assume all commands below are run as root. You can switch to a root terminal with the command
su –
And entering the root password. If you do not have a root password configured, you can
sudo su –
(Assuming your user has permission) and enter your own password.
2 – Stop CUPS
If CUPS is already running on your system, stop it with
systemctl stop cups
If you do not already have CUPS installed, install it but do not run it. On Ubuntu, CUPS can be installed with
apt install cups
3 – Get the script
Link to the script: https://cat.pdx.edu/staticfiles/sshlpd
Find where CUPS stores its backend files. This is likely in /usr/lib/cups/backend, but it may also be in something like /usr/local/lib/cups/backend or /usr/libexec/cups/backend. One way to find where the backend files are kept is with the following command
find / -name backend | grep cups
To use CUPS to interface with our printers, you need to add a script to this directory, either by downloading it and moving it there, or by downloading it directly into the directory. Once the script is there, make sure to change the permissions so that CUPS can actually run it.
cd /usr/lib/cups/backend
wget https://cat.pdx.edu/staticfiles/sshlpd
chmod 755 sshlpd
4 – Set up SSH Keys
CUPS uses a system account to run the print jobs. This user is the account that needs permissions to connect to our servers. The name of this user is likely lp. First, we need to make sure this user’s home directory exists and that the user is the owner of the directory.
mkdir -p /var/spool/lpd
chown -R lp:lp /var/spool/lpd
Next, we need to generate an SSH key for the lp user to connect to your MCECS account on one of our servers. Before we can do this, we need to make sure that lp has a login shell and switch to that account.
usermod -s $(which bash) lp
su lp
Once we are running as the lp user, we can generate the SSH key and add it to the authorized keys for your MCECS account.
ssh-keygen
cat path_to_public_key | ssh mcecs_username@linux.cecs.pdx.edu “cat >> ~/.ssh/authorized_keys”
Once the public key has been added to your MCECS account’s authorized keys, you can log out of the lp user and change it back to a no login shell.
exit
usermod -s $(which nologin) lp
5 – Add a user to the lpadmin group
To access the admin panel on CUPS’ web UI, you will need a local user that is part of the lpadmin group. You can add this group to a user with
usermod -aG lpadmin username
6 – Start CUPS
You can start CUPS with
systemctl start cups
Other Distributions
- Instead of setting up keys and a home directory for the lp user, it might be for the cups user
- The cups user likely has the root directory as its home directory. Change this to something that makes sense to you with
- usermod -d /new/home/dir cups
- You might get a message saying the that the cups user has expired when you try to switch to that account. Fix this with
- chage -E -1 cups
- The cups user likely has the root directory as its home directory. Change this to something that makes sense to you with
- You might need to install the package ghostscript
- Instead of lpadmin, the group might be called cups or printadmin. Users in the wheel group can also likely login to the admin page
- The name of the printer model might be generic postscript printer (en)
- If you’re running a distribution using an init system other than systemd (openrc, runit, etc) we trust that you can substitute systemctl commands with their relevant equivalents
Adding Printers
These are instructions for adding printers to CUPS from the web UI. If you are comfortable adding printers from the command line, feel free to do so.
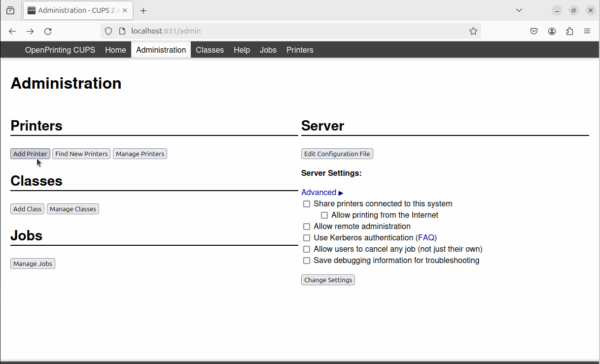
1 – Navigate the CUPS Web UI
Note: If prompted to login, use the credentials for the user in the lpadmin group
- Open a web browser and go to http://localhost:631
- Navigate to Administration > Add Printer
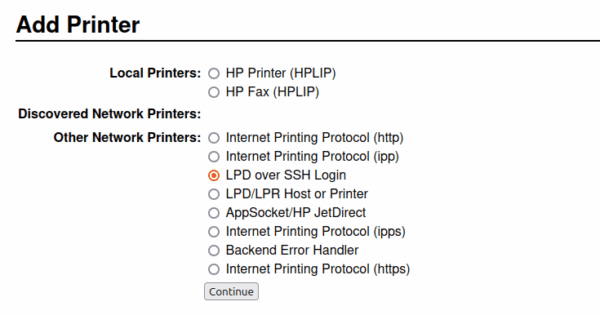
2 – Add a Printer
First, select “LPD over SSH Login” under “Other Network Printers”, the click Continue.
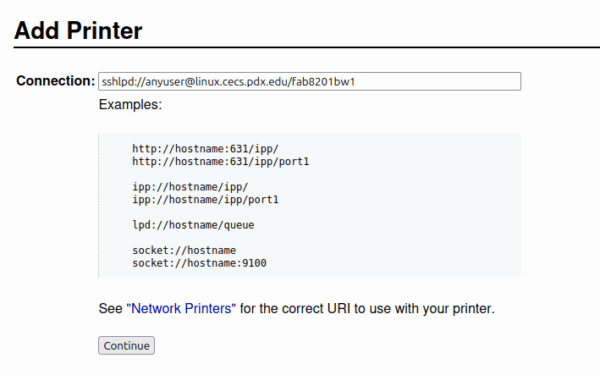
Set the connection to sshlpd://mcecs_username@linux.cecs.pdx.edu/printer_name. You can find a list of available printers by running the following command on one of our Linux machines
lpstat -a
After entering the connection link, click Continue.
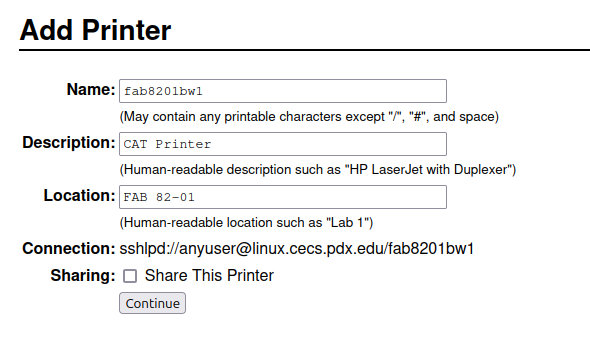
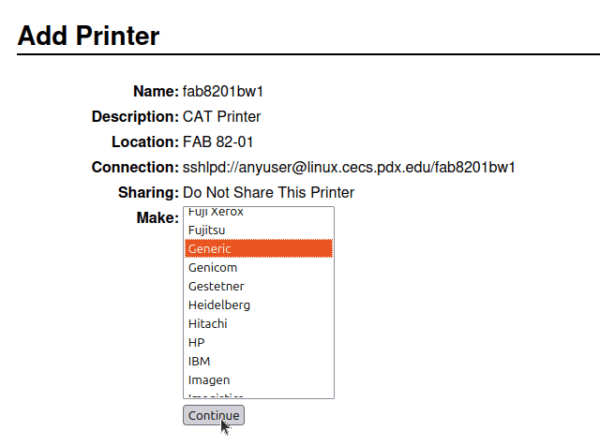
You can name the printer and set its location and description to whatever makes the most sense to you. After filling it in, click Continue.
Scroll through the list of provided Makes and select Generic, then click Continue.
Finally, scroll to the bottom of the Model selections and pick Generic PostScript Printer Foomatic/Postscript (recommended) (en), then click Add Printer.
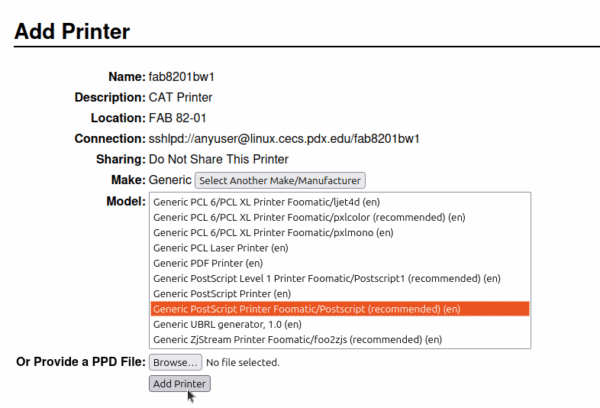
You might see a message saying that printer drivers are deprecated. You can safely ignore this.
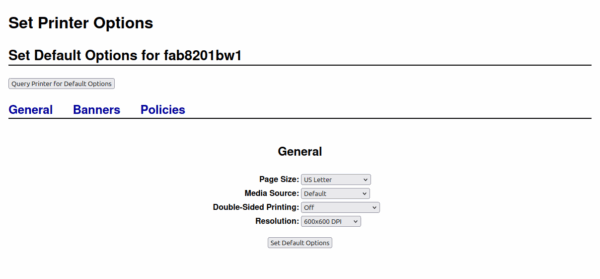
3 – Set Printer Options
Make sure you set the default page size to US Letter. To do this, click Set Printer Options and select US Letter from the dropdown menu. You may set the other defaults as you please. Then click Set Default Options.
4 – Print!
At this point, you should be able to print to one of our printers as normal.
Troubleshooting
Before we can troubleshoot we need to get more information about what’s happening in the background. To do so, go to the CUPS admin panel and under server setting click the checkbox next to “Save debugging information for troubleshooting” and then click Change Settings. Please note that this will restart CUPS and the web page will lose connection for a short time.
Once this is checked, try to print something again and read through the log file, likely found at /var/log/cups/error_log. CUPS output is verbose, so it’s recommended to find the number of the current job (this can be found under the Jobs tab in CUPS, where the job ID is printerName-jobNumber) and run the following command
grep “Job <number>” /var/log/cups/error_log
If you cannot find /var/log/cups/error_log, edit /etc/cups/cups-files.conf and set ErrorLog /var/log/cups/error_log so that CUPS logs to the file rather than to journalctl.
The output is fairly easy to understand and sometimes suggests a solution. Other times, more investigation will be needed. Here are some things to keep in mind:
- Double check the connection
- Is the MCECS username correct
- Is the name of the printer correct
- Is the URL in the right format: sshlpd://mcecs_username@linux.cecs.pdx.edu/printer_name
- Double check the SSH keys
- Does the correct user have access to the private key
- Did the public key get added to your authorized_keys file correctly
You might need to adjust SELinux settings, especially if you are running an RPM-based distribution. You have two options:
- Disable SELinux entirely by editing /etc/selinux/config so that
- SELINUX=disabled
- Adjust SELinux config to allow cups to ssh. This is more work, but better security practice.
Managing SELinux
- Run the following command and take note of the status, root directory, loaded policy name, and current mode. If it is disabled or the current mode is set to permissive, SELinux is probably not what is causing issues
- sestatus
- Put SELinux in permissive mode by editing /etc/selinux/config to match below and then rebooting your machine
- SELINUX=permissive
- You might have to edit sshlpd so that line 109 uses the full path for the ssh command, as seen below. You can find the full path with which ssh
- my $command = qq#/usr/bin/ssh ‘$connectToString’ …
- Try to print something to an MCECS printer. This print job should work. If it does not, there is another issue that needs to be solved.
- Put SELinux back in enforcing mode by editing /etc/selinux/config to match below and reboot your machine
- SELINUX=enforcing
- Run the following command. This will create two files, <module-name>.te and <module-name>.pp. The .te file will show you the changes being made to the policy and the .pp file is an SELinux modular policy file. You can name the module whatever you like.
- grep cups /var/log/audit/audit.log | audit2allow -p /etc/selinux/<loaded-policy-name>/policy/policy.* -M <module-name>
- Run the following command to install your new module
- semodule -i <module-name>.pp
- Print!