Persistent Shell Sessions with Screen
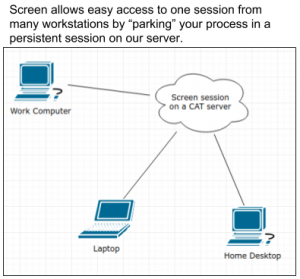
Screen is a program that facilitates the management of multiple shell sessions. When you run screen from a Linux command line, it will open a screen session on top of your current command line window, with a few important benefits:
- Screen windows behave similarly to multiple tabs on a web browser, letting you switch to other “sessions” with a few keystrokes.
- Screens give you the ability to “disconnect” your screen session, leaving your running programs intact and allowing you to reconnect at a later time to resume your work. You can imagine this like minimizing a window instead of closing it. This is invaluable if you have a long running process and wish to start it and return to check on its progress from time to time.
- If your terminal session is closed (via ssh or through a Linux X Windows session), all work that you’re doing stays around. The screen session will become “detached” but is still active. This means that you can pick up right where you left off easily. This adds a layer of security for your important work, and also provides the ability to easily work on the same project from many different machines.

How to use Screen
Opening Screen
To open a screen session, type “screen” from the command line like you would for any other command. Once run, you will be placed inside a new screen session, which looks a lot like a normal terminal window.
Once within screen, the main command that you use to manage your shell window(s) is “ctrl-a” combined with any number of other keys. For example, “ctrl-a” followed by “?” will bring up the screen help menu. You will use “ctrl-a” followed by something for virtually everything within your screen session.
Creating & Switching Screen Windows
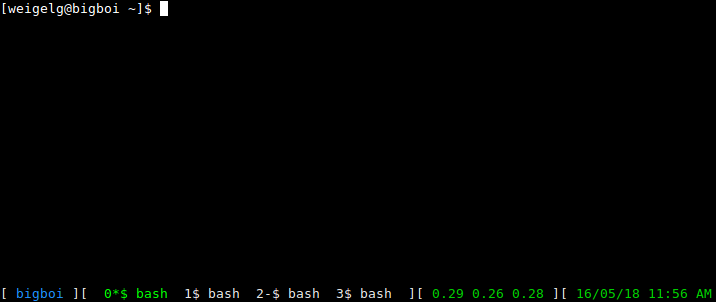
From within a screen session, you can also open multiple windows and easily tab switch between them. New windows can be made with “ctrl-a” -> “c”; it’s important to understand that each screen “window” is actually an entirely new shell at the command line. When you create a new window you’ll see that all of your windows are listed at the bottom of the window, and the active window is highlighted in green. It should look something like this:

In order to switch through all of your active windows, you can use “ctrl-a” -> “n” to go to the next window and “ctrl-a” -> “p” to go to the previous window. Each window also has an associated number, as you can see on the bottom of the above screenshot. An alternative to switching windows is to use “ctrl-a” followed by the tab number to jump right to that window.
Disconnecting & Reconnecting to a Screen Session
You can also detach from a screen session manually with “ctrl-a” -> “d” and then reattach by typing “screen -r” at the command line when you log back into the system.
Importantly, reconnecting with screen -r will open the screen session that you’ve most recently closed, meaning that so long as you don’t accidentally spin up multiple screen sessions it will be enough to always get back to the session you want.
Using this knowledge you could, for example:
- SSH to an MCECS Linux server.
- Start up a new screen session.
- Do any work you need inside.
- Detach from screen.
- Go home and reattach to the same exact session.
All without any fear of losing your work from a system crash or forgetting to save.
Managing Multiple Screen Sessions
From the above sections you should have more than enough working knowledge to be able to start using screen effectively. However, there are some instances in which you might create multiple screen sessions and you will need to know how to manage those effectively.
Re-attaching to a Screen Session
A very common mistake people make when first using screen is to accidentally type “screen” instead of “screen -r” when meaning to re-attach. This will create a second screen session and if you detach and attempt to reattach you’ll see the following:

Solving this problem is very simple, you can type “screen -r ” to enter a screen session with the given number. In the above example, my screen sessions have PIDs of 14573, 14563, and 14556, as you can see. So you could simply type “screen -r 14573” and then from within screen you can use the command “ctrl-a -> \” to delete your current screen.
“Ctrl-a -> \” is a new command that won’t just detach you from the screen and leave it running, it will remove it forever, so use it with caution. After deleting the screen you accidentally created, you should be able to “screen -r” back into the screen session you wanted.
Effectively Using Multiple Screen Sessions
Another way to find the screen session you want is to use “screen -ls” which will list all screen sessions you have running. If you’ve been creating new screens by just typing “screen” than the output of “screen -ls” will look something like this:

While this does show you the date that each screen session was created, it’s kind of difficult to differentiate which screen is which. Thankfully, screen has a solution.
On creating a new screen window, instead of using “screen” use “screen -S ” to give your new session a name of your choosing. This aids in identifying which screen is which as you can see below:

I have two screen sessions that I’ve named “school” and “work.” You can then reattach to a named screen using “screen -r ” to quickly get back to the workstation you want.
