Using OpenVPN on Linux
VPN stands for Virtual Private Network. Once you are connected, all web site traffic will be directed through PSU’s VPN hardware, and it will appear that you are connected physically to PSU’s network. This will allow you to use private MCECS services that require a connection to the PSU network, like remote desktop and VNC.
This guide is for Ubuntu distributions, and will likely work with other Debian-based linuxes.
CECS vs. CECS Full Tunnel
CECS – a split tunnel configuration. Only data directed at PSU is sent through the VPN. The rest of your connections to other sites on the internet go through your ISP.
CECS Full Tunnel – a full tunnel configuration. ALL data from your computer is sent to PSU through the VPN. Should only be used for special needs.
Most MCECS users should find the CECS configuration sufficient for their needs. It is possible to set up both profiles and decide which one to use when connecting to the VPN.
When would full tunnel access be required
Full tunnel access is needed for users attempting to access the banner administrative interface, banner report downloads, campus drupal website maintainers, among other things.
Installing OpenVPN and Downloading the Config Files
Run this in a terminal window:
sudo apt-get install openvpn unzip wget
wget https://intranet.cecs.pdx.edu/downloads/files/openvpn/current/cecs_linux_openvpn.zip
unzip cecs_linux_openvpn.zip -d cecs_linux_openvpn
To connect using OpenVPN, you have the option of using a GUI-based interface or the command line
Connecting Using Network Settings (GUI)
If you’re using Ubuntu 16.04 or later, you can manage your VPN connection through the Network Settings GUI. However, you will need to install a couple of packages first. To install the packages, run this in a terminal window:
sudo apt-get install network-manager-openvpn network-manager-openvpn-gnome
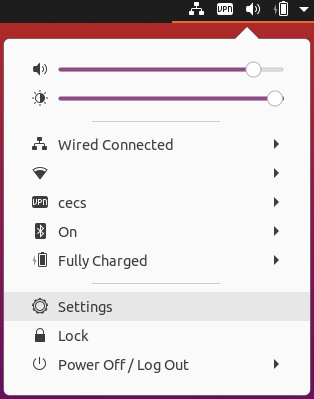
The remaining steps are slightly different between versions of Ubuntu. In 20.04, click on the system tray, and then click on the settings icon (In 16.04, click on the Network icon in the system tray and click Edit Settings):
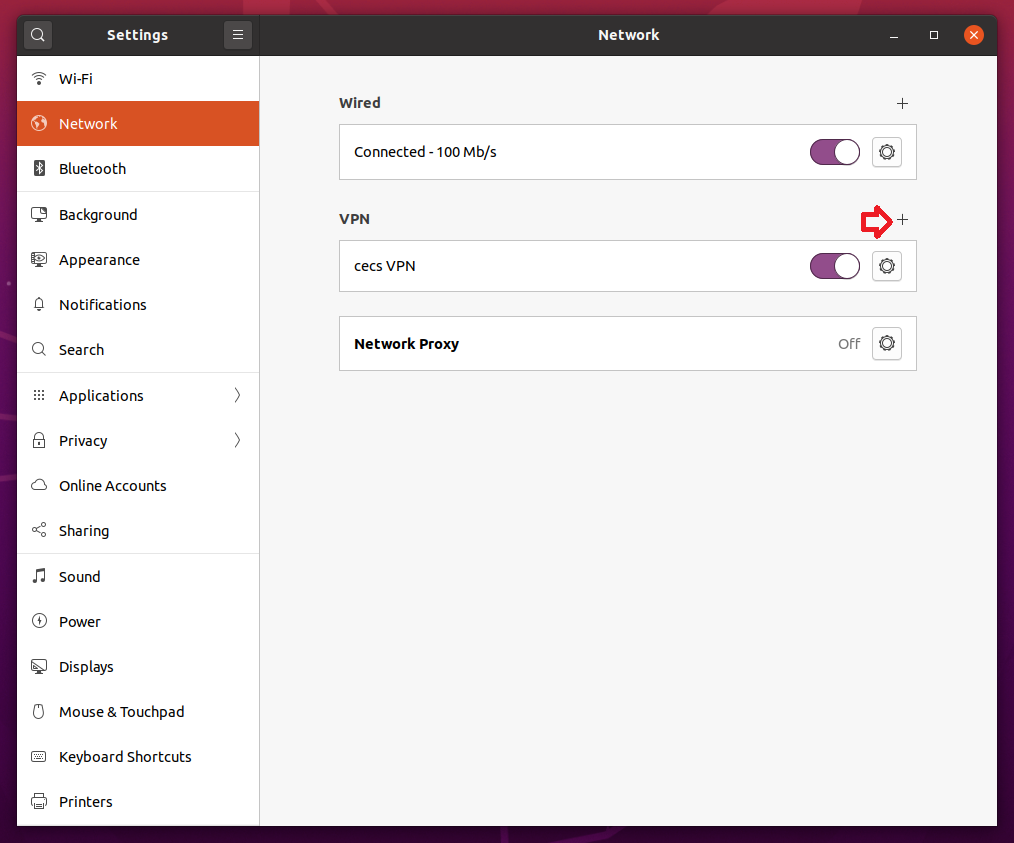
Navigate to the Network tab and then click ‘+’ next to VPN (in 16.04, click ‘Add’):
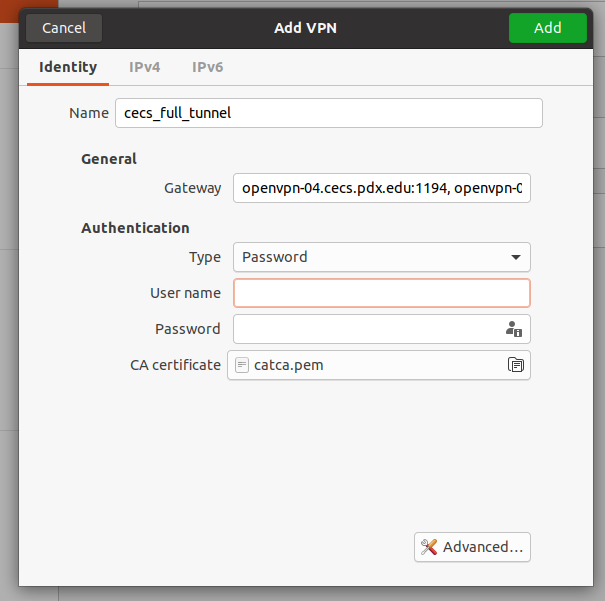
In the dialog that appears, click “Import from file…”

Navigate to the directory where you’ve stored the cecs config files (~/cecs_linux_openvpn if you followed the instructions above exactly) and select either cecs.ovpn (split tunnel) or cecs_full_tunnel.ovpn (full tunnel). You can repeat the process for the other file if you want to add both. If you get an error saying that the configuration file can’t be imported, you may need to restart your system to load the new packages you’ve installed.
In the box that appears, select “Password” under Authentication Type, and enter your MCECS credentials for User name and Password. CA Certificate should be auto-populated with catca.pem, if it’s not, click the file browse icon and select this file in your file system (it should be in the same place as the .ovpn files if you’ve followed the instructions above).
Now when you click on the system tray, you should see a new context menu labeled “VPN” – expand this and you should see the either “cecs” or “cecs_full_tunnel” (or both) depending on which configuration file you imported, along with a toggle. Now you can simply use this toggle whenever you need to connect to or disconnect from the VPN.

Connecting Using the Command Line Client
If you use a version of Linux other than Ubuntu, or you’d prefer to use the command line utility only, you can also connect to the VPN using the command line OpenVPN client.
Connecting to the OpenVPN in split tunnel mode
Run this in a terminal window:
cd cecs_linux_openvpn
sudo openvpn cecs.ovpn
Leave this terminal window open while you want to be connected to the OpenVPN. To disconnect CTRL+C while focused on the terminal window that holds you OpenVPN connection. If you just close the terminal window without properly disconnecting you might either remain connected, or get the OpenVPN software into a confused state where networking doesn’t work properly. If this happens run “sudo killall openvpn” in a terminal window, or reboot your machine.
Connecting to the OpenVPN in full tunnel mode
Run this in a terminal window:
cd cecs_linux_openvpn
sudo openvpn cecs_full_tunnel.ovpn
Debugging
A common issue when using the regular OpenVPN configs (split tunnel) is that your DNS systems DNS server might not allow traffic from the IP address you get assigned when connected to the OpenVPN. An easy work around for this is to configure your system to use fully public DNS servers like Google’s. Google’s public DNS servers are 8.8.8.8 and 8.8.4.4.