Using Mobility Print with MCECS Printers
Mobility Print is an application to install a curated list of popular MCECS printers onto your Tier 3 (self managed) Windows, MacOS, iOS, or Android devices so that printing is fast and easy.
Installation
To install printers, get on the VPN and then go to the MCECS Mobility Print page and download the installer with the following link. Make sure to read the page’s instructions for installation.
https://mobilityprint.cecs.pdx.edu
Mobility Print cannot be installed on CAT-supported machines. It is only intended for self-managed devices, such as a personal computer or smartphone.
A list of printers that can be installed with Mobility Print can be found at the bottom of this page. Once installed, you should be able to see and print to any added printers as normal.
For more information about the using the VPN, read our guide with the following link
Additional Installation Notes for Mobility Print
Your username for mobility print is just your MCECS username. Unlike some other CAT resources, you do NOT need to put CECS before your username to use mobility print.
Windows
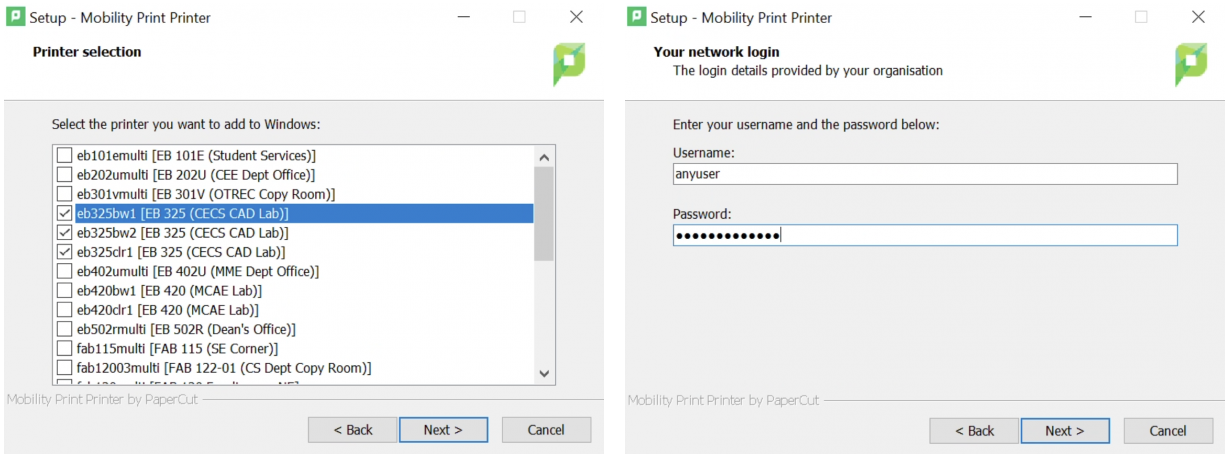
Run the Mobility Print installer and then choose which printer to install. Enter your MCECS login credentials and then the printers will be added to your computer.
If you need to add another printer, run the Mobility Print installer again
To remove a printer, follow these instructions from Microsoft to find your list of installed printers and then use the Remove option with the selected printer.
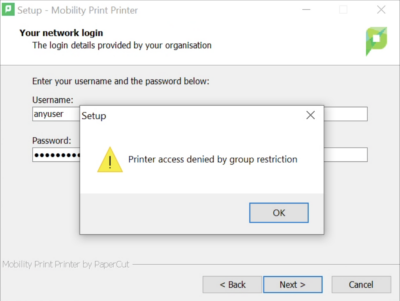
If you see the following error message, it means that you do not have permission to install at least one of the printers you selected. Go back and change your selection.
MacOS
Running the Mobility Print installer will add all enabled MCECS printers onto your MacOS computer.
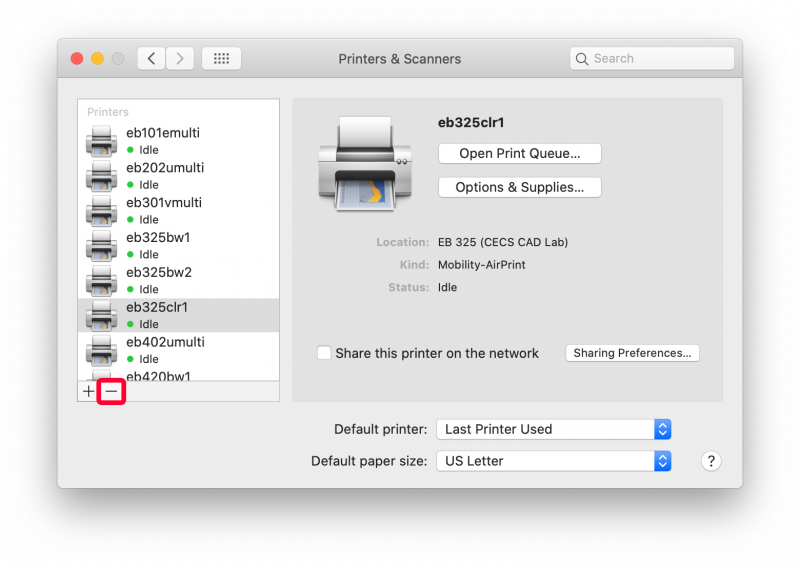
To remove the unneeded printers, go into System Preferences and then select Printers & Scanners. Select the printers to remove and then click the minus symbol ( – ) button.
To add back a printer, run the Mobility Print installer again.
iOS/iPadOS
When you follow the above link on an iPad, it may auto-detect MacOS as your operating system. Change this to iOS by clicking the correct icon at the bottom of the page.
Adding the Mobility Print profile will add all enabled MCECS printers onto your iOS device. You can remove the profile by going to Settings > General > VPN & Device Management, clicking on the profile, and hitting Remove. Please note that this might only remove printers you have not used before, leaving previously used printers functional.
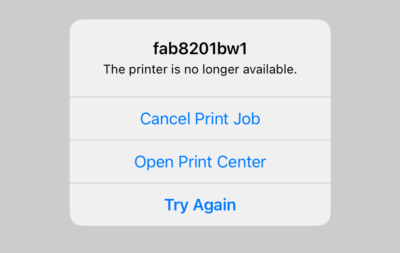
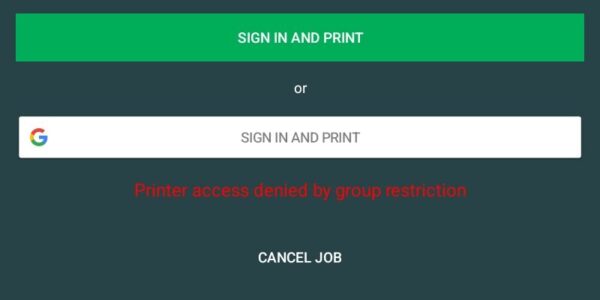
Mobility Print will ask you to login with your MCECS credentials the first time you try to use a new printer. Please note that this tends to fail on the first attempt but work on the second. After you have signed into a printer, it will remember the credentials indefinitely. If you see the following popup after sending a print job, it likely means that you do not have access to that printer. Choose a different printer and try again.
Android
Downloading the Mobility Print app will allow you to access all enabled MCECS printer from your android device. Unfortunately, you cannot remove one printer without removing all of them. To remove Mobility Print, simply delete the app.
Mobility Print will ask you to login with your MCECS credentials for every print job that you send. If you see the following error message, it means you do not have permission to print from the selected printer. Choose a different printer and try again.
List of Printers with Mobility Print Enabled
|
eb101fmulti |
fab105multi |
|
Note: Both fab16002multi and eb402umulti can ONLY print double-sided print jobs. Both fab16002multi-single and eb402umulti-single can ONLY print single-sided print jobs.