Bulk Scanning Facilities

Bulk scanning is available in the FAB 55-17 MCECS General Computer Lab (in the basement of FAB). The device, an HP Digital Sender Flow station referred to as the “Bulk Scanner”, is located near the entrance to the lab and can scan documents to USB media or to e-mail.
You will need an active MCECS account and card access to MCECS General Labs to use this device.
Quick Guide:
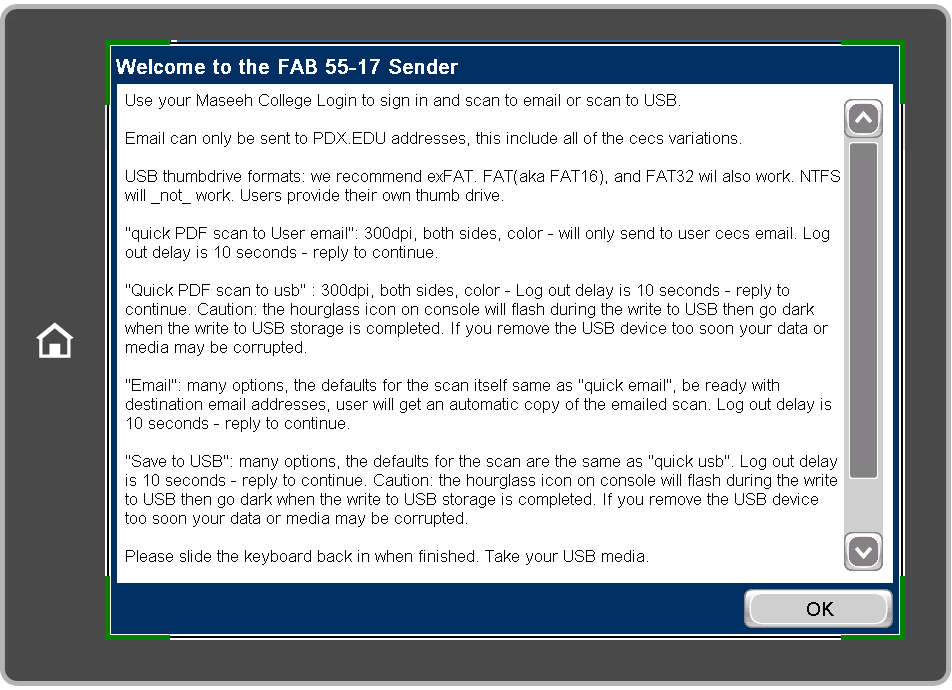
Use your Maseeh College Login (MCECS Credentials) to sign in and scan to email or scan to USB.
Email can only be sent to PDX.EDU addresses, pdx.edu, mme.pdx.edu, cecs.pdx.edu, cee.pdx.edu, cs.pdx.edu, etm.pdx.edu, cat.pdx.eduions.
USB thumbdrive formats: we recommend exFAT. FAT(aka FAT16), and FAT32 wil also work. NTFS will not work. Users provide their own thumb drive.
“Quick PDF scan to User email”:
“Quick PDF scan to usb”:
“Email:”:
“Save to USB”: many options, the defaults for the scan are the same as “quick usb”. Log out delay is 10 seconds – reply to continue. Caution: the hourglass icon on console will flash during the write to USB then go dark when the write to USB storage is completed. If you remove the USB device too soon your data or media may be corrupted.
Please slide the keyboard back in when finished and take your USB media.
Problems? Report them to CAT front desk in FAB 82-01 or to support@cat.pdx.edu.
Make sure that any staples or clips have been removed from items sent through the automatic feeder.
Do not use the automatic feeder for the following items. If you need to scan these items, use the flatbed portion of the scanner instead, or use a dedicated flat bed scanner.
- Any media that is torn, crumpled, heavily wrinkled.
- Any non-permanent media: such as those written with pencil, chalk, crayon, or written on post-it notes.
- Any media that is less than 4 inches on the shortest dimension.
Please come talk to the CAT if you are unsure if your document meets this criteria.
Detailed instructions on how to use the Bulk Scanner
Note: These links below are to sections on this page, in case you know what information you need out of this page.
Waking up the device
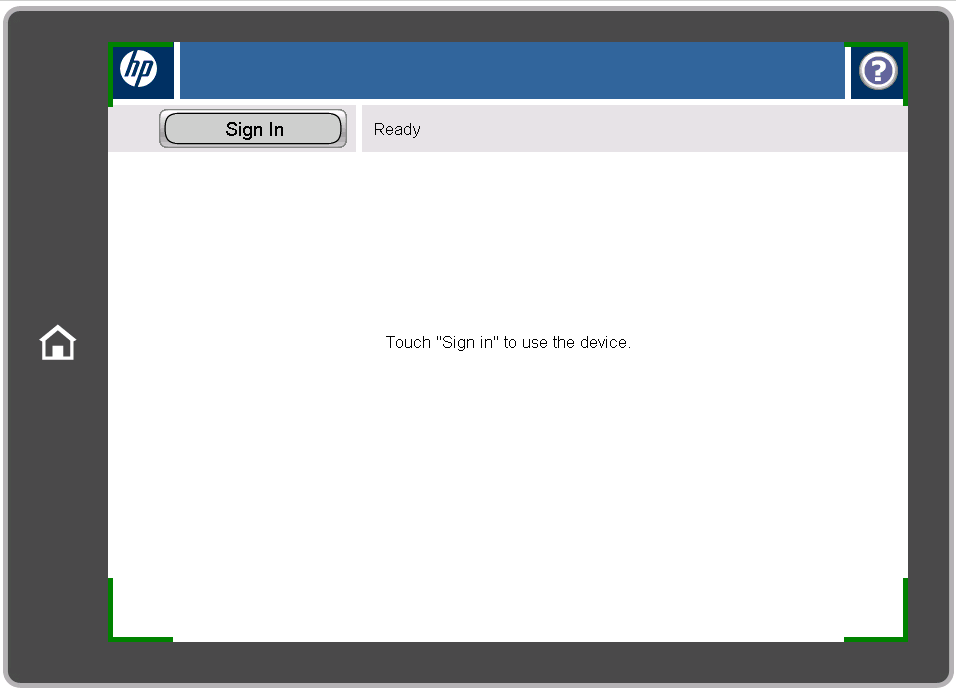
If the screen is blank – assuming the power button is lit – tap the screen, or tap one of the console buttons,
or gently slide out the keyboard at the front under the display and tap a key on the keyboard.
The Welcome message should appear. This screen is a condensed version of the Advanced instructions.
To continue, touch “Sign In”.
Logging in to Bulk Scanner
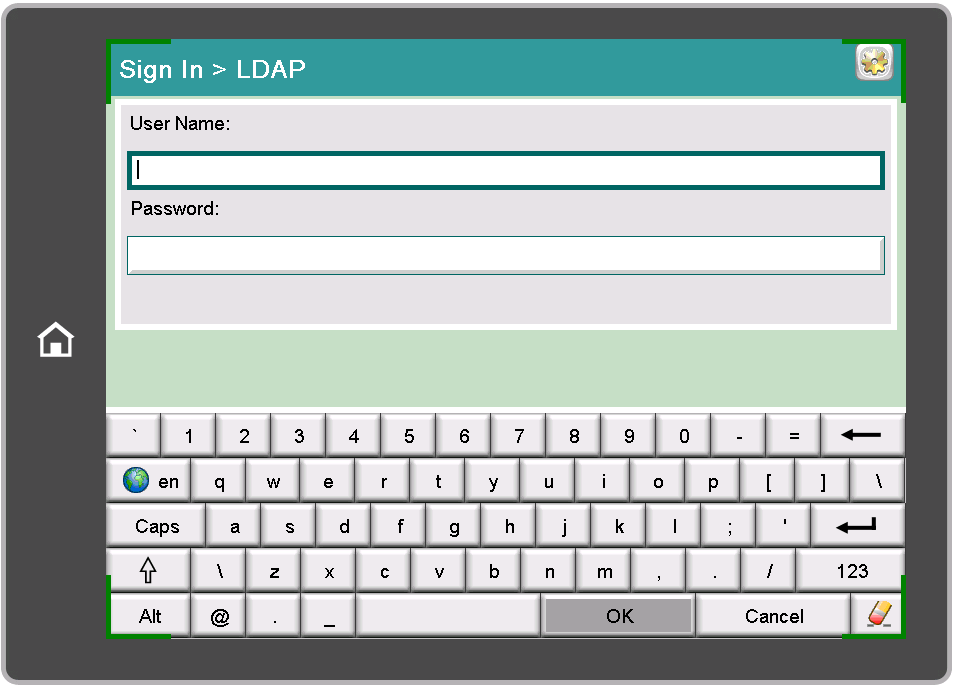
At the “Sign In > LDAP” enter your MCECS username and password. Then tap “OK” on the screen or “Enter” on the keyboard.
Note that the Bulk Scanner requires your Linux password. Most users have their Windows and Linux passwords synchronized so you should not have any problems. In the rare case that you have separate passwords for these environments, note that the Bulk Scanner requires your Linux password.
Staying Signed in
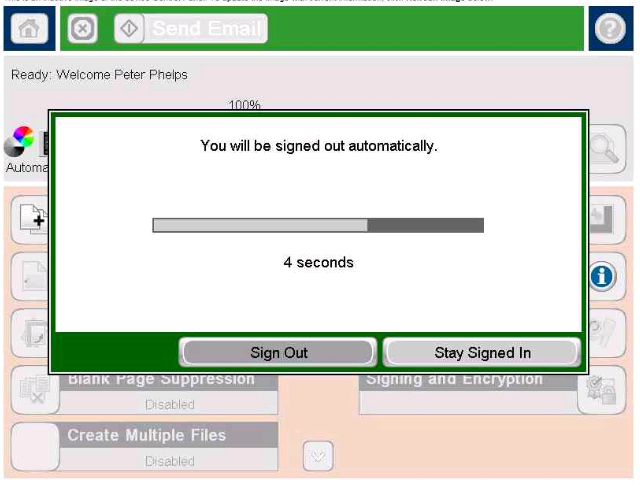
If you see this message, you need to select “Stay Signed in” if you wish to continue.
If you are doing a quick scan or quick email, you can safely ignore this if the material to be scanned is already correctly placed in the automatic feeder.
Bulk Scanner Illustrated and Advanced Instructions
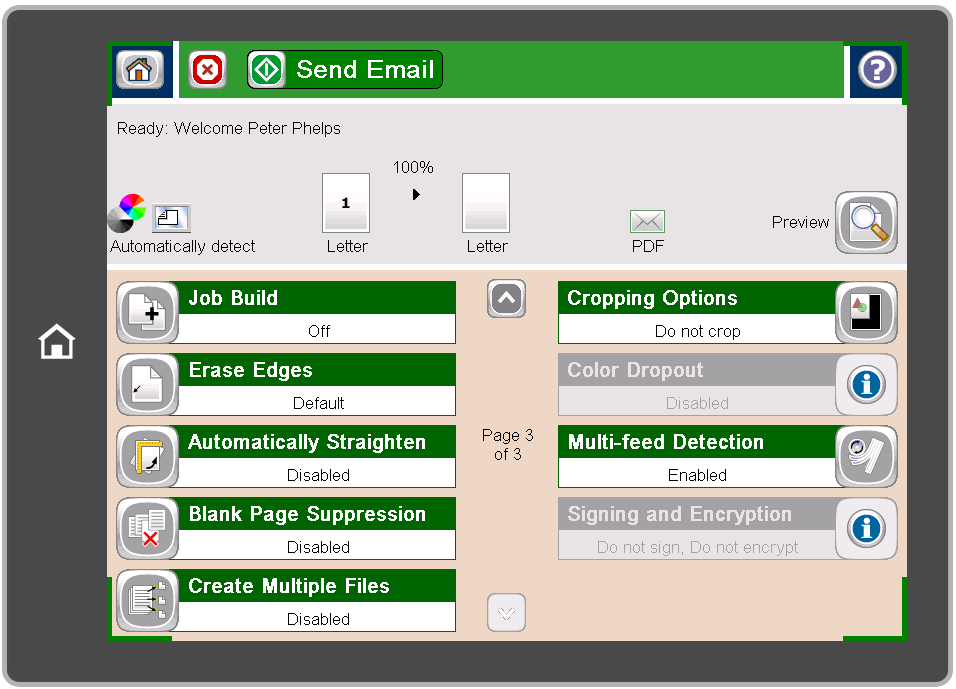
In the next image you can see the Advanced Options given.
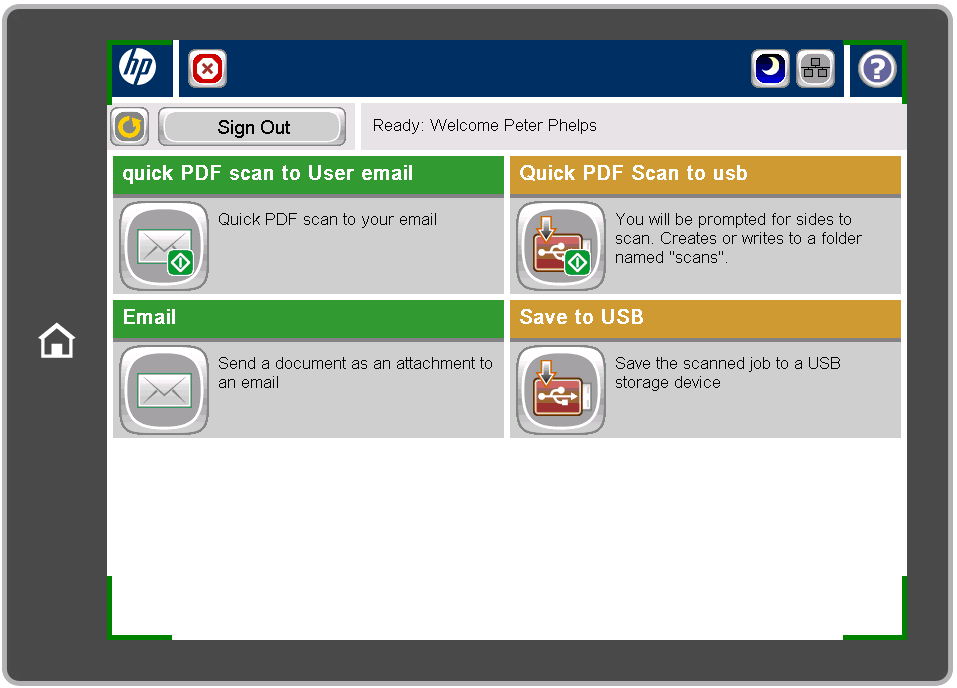
The following sections explain the 4 main scanning choices on the main screen in detail.
Quick PDF scan to User email: Scan and send to your MCECS email. Duplex, 300dpi, color.
(Scan to )Email:Same as above, but with more options.
Quick PDF Scan to USB: Scan to USB storage. Duplex, 300dpi, color. Creates or writes to “scans” folder on root directory of USB.
Save to USB: Same as above, but with more options.
Quick PDF Scan to User Email:
Place the pages in the tray, then select
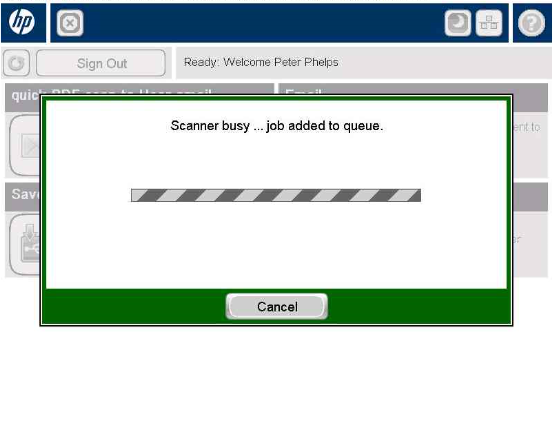
“Quick PDF Scan to User Email” The message “Scanner busy .. job added to the queue” will appear, take your pages after the scanning is finished.
Afterwards check your PSU email.
(Scan to )Email:
The From: field is already filled out and unchangeable.
The To: and CC: fields must be pdx.edu and MCECS email addresses only (see Restrictions on in the Quick Guide above). You will get an automatic BCC: copy of this email scan.
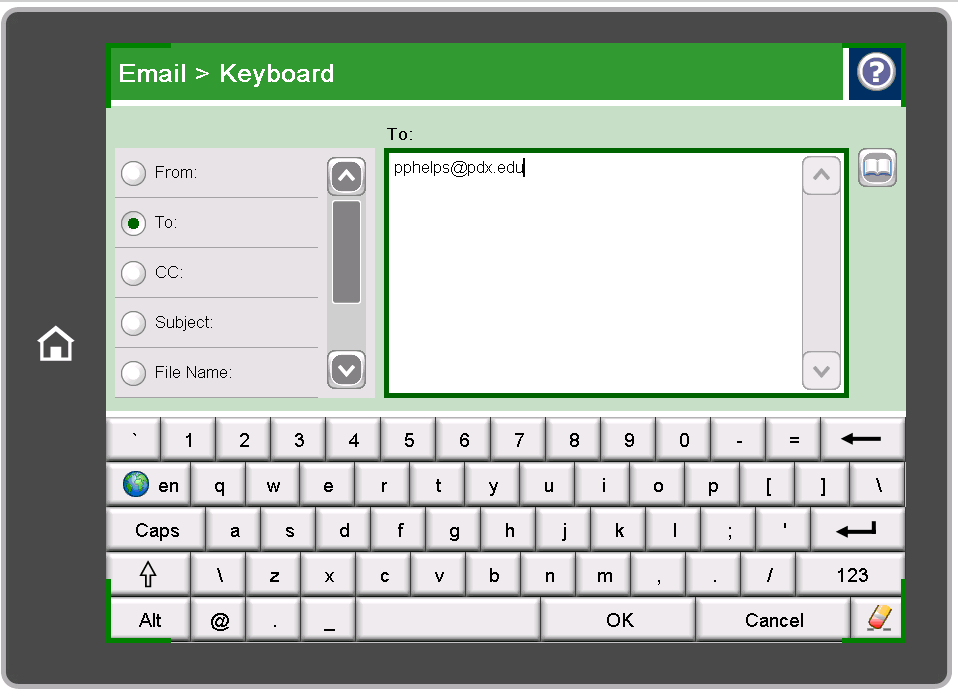

You have the option of sending to multiple recipients in both the To: and CC: fields
Tip: Using the touch screen to select between the To:, CC: , Subject, File Name and Message fields is easiest.
Fill in Subject:, File Name:, Message: fields as needed.
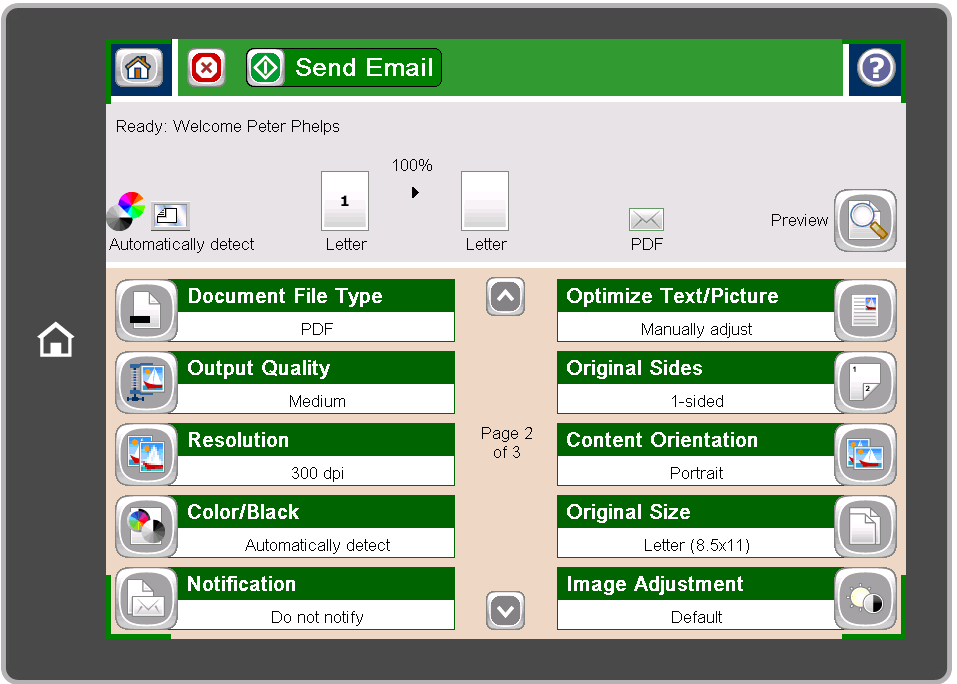
Put the pages to be scanned in the Feeder (look for the Green LED on the tray, Scan side up for single sided),
then tap “Send Email” or if you need to make tweaks and adjustments, tap “More Options”
Tip: If you need to scan using the flat bed, please position the material to be scanned and if you wish, click “Preview”.
We recommend that you start with our default settings for most documents and homework submissions.
This is your opportunity to get a copy of the scan, look over it, and make changes if necessary.
Please Note:
Any settings changes will not persist after you log out from the Sender.
The 300 dpi medium quality PDF is the current (2016-2017 A.Y.) PSU standard for electronic archiving, and is of high enough quality to allow for reasonably accurate OCR (Optical Character Recognition) for conversion to text from most standard fonts. This also helps to keep file sizes more reasonable.
Scans of handwriting, detailed images or other graphics may require a higher dpi and-or higher output quality.
Accurate OCR of handwriting is doubtful. Using “Preview” to check the quality is recommended.
Quick PDF Scan to USB:
Users must provide their own USB storage device.
Scan to USB storage media needs to be preformatted and should use either exFAT, FAT16(aka FAT), or FAT32. We recommend exFAT as it will work on Windows, Mac OS X, and Linux.
This scanner will not recognize NTFS formatting.
We strongly recommend that you label your USB drives with your MCECS username or e-mail address. It helps with locating you if we find it left in the labs.
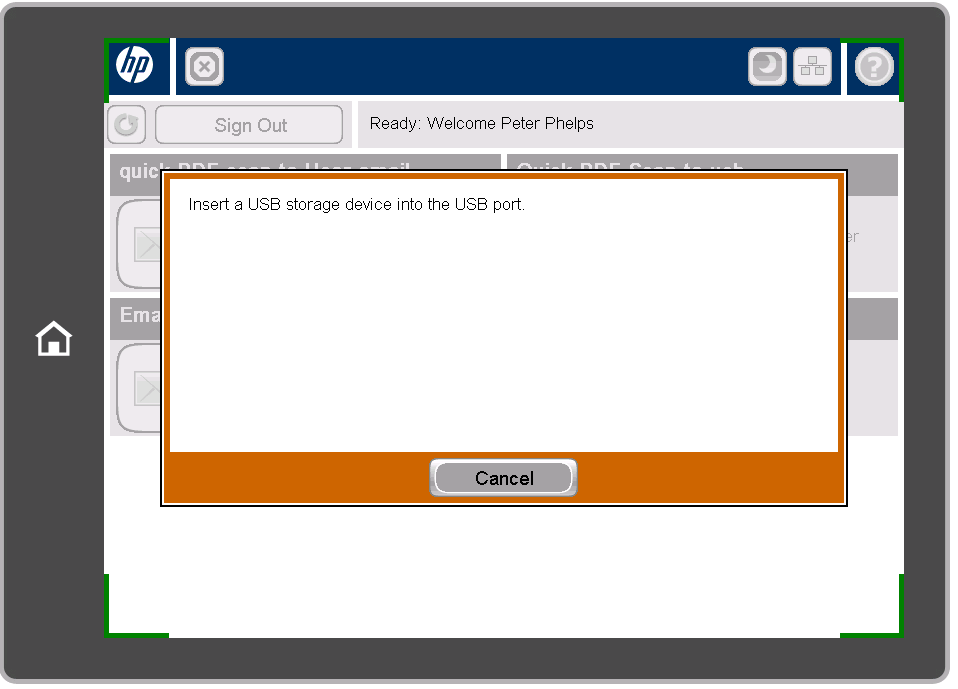
If you see the message “Insert a USB storage device into the USB port” you have 10 seconds to comply or cancel, otherwise you will be logged out.

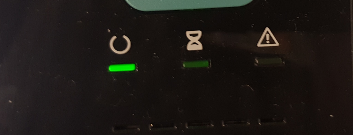
Warning! – Wait until the light under the hourglass icon on the Sender console goes and stays dark or you risk damaging your USB data.
Save to USB:
Users must provide their own USB storage device.
Scan to USB storage media needs to be preformatted and should use either exFAT, FAT16(aka FAT), or FAT32. We recommend exFAT as it will work on Windows, Mac OS X, and Linux.
This scanner will not recognize NTFS formatting.
We strongly recommend that you label your USB drives with your MCECS username or e-mail address. It helps with locating you if we find it left in the labs.
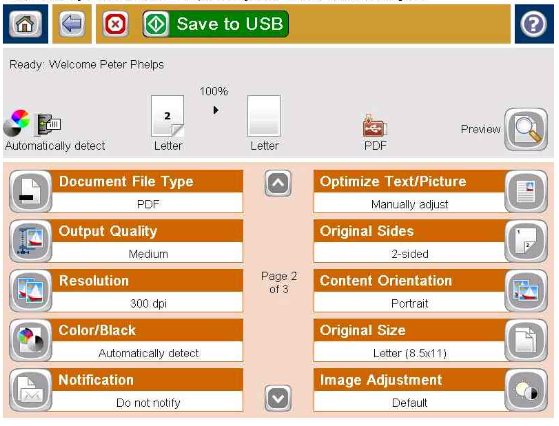
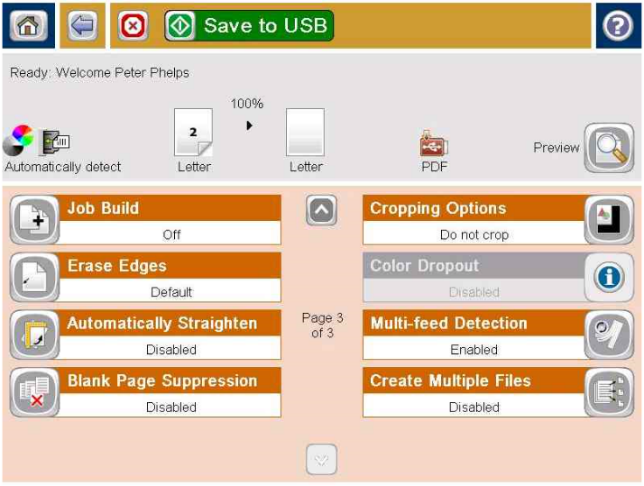
Select or create a folder for the scan destination.
We recommend that for most documents and homework submissions that you start with our default settings.
This is your opportunity to get a copy of the scan, look over it, and make changes if necessary.
Please Note:
Any settings changes will not persist after you log out from the Sender.
The 300 dpi medium quality PDF is the current (2016-2017 A.Y.) PSU standard for electronic archiving, and is of high enough quality to allow for reasonably accurate OCR(Optical Character Recognition) for conversion to text from most standard fonts. This also helps to keep file sizes more reasonable.
Scans of handwriting, detailed images or other graphics may require a higher dpi and-or higher output quality.
Accurate OCR of handwriting is doubtful. Using “Preview” to check the quality is recommended.
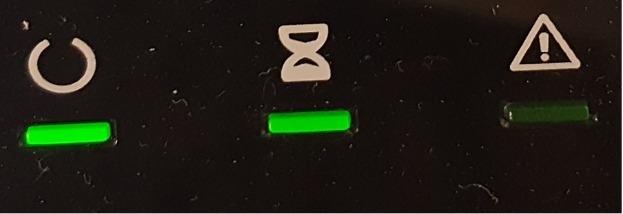

Warning! – Wait until the light under the hourglass icon on the Sender console goes and stays dark or you risk damaging your USB data.